
You must streamline your connections for direct SSH first before you can transfer files to the NCCS.
For file transfers to ADAPT, please use the Transfer Nodes.
For Command-Line Users
In standard bastion configurations, you can run the following:
$ scp /my/file.txt userid@discover.nccs.nasa.gov:/target/directoryIf rsync is available on your client, it might be a better alternative to scp because you can resume a transfer if there is a network issue. For example:
$ rsync -av --progress /my/file.txt userid@discover.nccs.nasa.gov:"/target/directory"For more assistance with either of these commands run “man scp” or “man rsync” to see their manual pages.
MobaXterm
MobaXterm is recommended for Windows users because its built in scp/rsync is similar to Linux/MacOS configurations.
See the instructions for how Windows users can streamline their connections by downloading and configuring MobaXterm
Once downloaded, you can start a local terminal within the application window.
You may test file transfer by running either:
$ scp /my/file.txt userid@discover.nccs.nasa.gov:/target/directory
$ rsync -av --progress /my/file.txt userid@discover.nccs.nasa.gov:"/target/directory"
It will ask you to authenticate and then it will display the transfer status. For more assistance with either of these commands, run “man scp” or “man rsync” to see their manual pages.
For WinSCP users
This video instructional describes how to perform a secure file transfer between the Discover systems and a local windows workstation. The user will be given instruction on how to download and install the PuTTy terminal emulator software as well as the WinSCP secure GUI file transfer utility necessary to accomplish file transfers.
If you have a NASA provided laptop and would like to configure WinSCP to use your PIV card, you may follow the instructions on this PowerPoint slide. Note that if you are NOT a discover-nastran user you should use “discover.nccs.nasa.gov” as the hostname in WinSCP. If you do not have a NASA provided laptop and will be using an RSA Token to authenticate, you may follow these steps:
- Download the following configuration files to automatically fill in the required settings for connecting to Discover and Discover-Nastran. On the WinSCP “Login” window click the “Tools” button in the bottom left, then click “Import/Restore.”
Note: These INI files assume that Putty is installed in the default location for Windows 10 64-bit. Users are highly encouraged to use the newest versions of Putty 64-bit and WinSCP.
The settings from the INI files do not include usernames so enter your NCCS userid in the username field on the Login window. You must also click the “Advanced” button to open the Advanced Site Settings window. Click “proxy” on the tree to the left. Enter your userid in the username field here as well. Now click “ok” then “save” and you may login to your WinSCP Session.
Note: Do NOT enter an RSA Tokencode or NCCS password in the password field on the Login window. This may result in the connection being closed so leave the field empty. You will be prompted for PASSCODE/Password interactively.
You may also configure WinSCP manually as shown below, or you may check your imported settings.
Session Settings in Login Window
| Hostname | discover.nccs.nasa.gov or discover-nastran.nccs.nasa.gov |
| Username | your NCCS userid |
| Password | LEAVE BLANK |
| Advanced | Click to edit Proxy Tab |
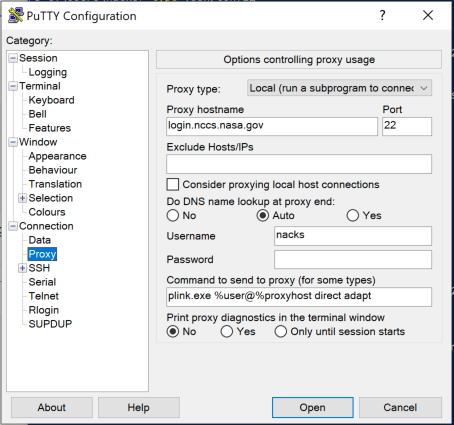
.PNG)
Proxy Tab in Advanced Site Settings
| Proxy Tab | local |
| Local Proxy Command | "C:\\Program Files\\PuTTY\\plink.exe" -pw %pass -l %user %proxyhost direct %host(This assumes that plink.exe is found under C:\\Program Files\\PuTTY. Also note that “-l” in the command above is a “dash lowercase L”. ) |
| Username | NCCS userid |
| Password | LEAVE BLANK |
| Proxy Hostname | login.nccs.nasa.gov |
| Do DNS name lookup at proxy end | Yes |
Once you have configured your settings you may click the Login button to Launch WinSCP. Accept the host key fingerprint if it prompts for it, which you may verify the identity of here. Enter the PASSCODE (WinSCP sometimes calls this the “proxy password”) which is your RSA Tokencode. Finally, enter your NCCS Password at the regular password prompt and you should now have an open session.
Note: A WinSCP feature request that asks for WinSCP to prompt for the proxy password if it is left blank is currently being tracked as bug #468; however, the original bug was filed in 2009 so it’s unclear how much traction it has at the moment.
Also, once you have configured WinSCP, do NOT launch PuTTY using the button embedded within WinSCP. Doing so will cause WinSCP to connect back to login.nccs.nasa.gov using a previously used PASSCODE which results in a locked token. Launching the standalone PuTTY should always work fine.